Choosing the right DICOM 3D viewer depends on your specific needs - whether clinical, educational, or research-focused. Here’s a quick breakdown to help you decide:
- Define Your Use Case: Clinical diagnosis requires FDA/CE-certified tools with precise visualization features, while research or teaching may benefit from flexible, open-source options.
- Evaluate Core Features: Look for capabilities like 3D rendering, multiplanar reconstruction (MPR), volume rendering, and AI-assisted tools for accuracy and efficiency.
- Assess Performance: Ensure the software handles large datasets smoothly, preferably with GPU acceleration or server-side rendering for web-based tools.
- Deployment and Integration: Decide between standalone desktop applications for high performance or web-based viewers for remote access. Confirm seamless integration with PACS, RIS, and EHR systems.
- Licensing and Support: Compare subscription, perpetual, or open-source models. Check for regular updates, strong documentation, and responsive vendor support.
Key Considerations:
- Clinical users need advanced visualization and compliance with regulatory standards.
- Researchers prioritize flexibility and tools for segmentation, annotation, and data export.
- Hospitals require scalable, secure systems with multi-user access and integration capabilities.
Quick Tip: Test different viewers using real datasets during free trials to ensure they meet your workflow demands.
MedDream DICOM Viewer 7.9.0 version video tutorial
Step 1: Define Your Use Case and Requirements
Before diving into specific DICOM 3D viewers, it’s crucial to pinpoint how you plan to use the software. A viewer designed for surgical planning might not be ideal for teaching anatomy, and tools tailored for individual radiologists may struggle to meet the demands of a large hospital. With over 50 imaging modalities defined by the DICOM standard - ranging from CT and MRI to mammography and X-ray angiography - your first task is to identify which features are essential for your needs.
Clinical and Diagnostic Use Cases
When it comes to diagnosing patients or planning treatments, your DICOM viewer must meet strict standards and offer advanced visualization tools. In the U.S., any viewer used for medical decisions must have FDA 510(k) clearance, while Europe requires CE Class IIa certification.
"If you are using the viewer to make medical decisions, the software must carry FDA 510(k) clearance (USA) or CE Class IIa certification (Europe). Without this, you are exposing your practice to significant liability." - Andra Bria, Medicai
For radiologists and diagnostic imaging professionals, features like multi-planar reconstruction (MPR) are essential. This allows images to be displayed in axial, sagittal, and coronal planes, while windowing and leveling controls help detect subtle changes in tissue density. Similarly, surgeons need 3D visualizations of anatomy and pathology to prepare for complex procedures. Different specialties also demand specific tools: oncologists require tumor tracking, orthopedists need bone structure analysis, cardiologists depend on blood flow imaging, and neurologists focus on soft tissue details.
Precision is equally critical. Accurate measurements of distances, angles, areas, and volumes are essential for monitoring disease progression and planning interventions. For example, the Synapse 3D viewer demonstrated its clinical-grade performance by loading a 109-image CT dataset in just 5 seconds and rendering volumes within 2 seconds. Modern tools even use AI to cut 3D reconstruction times from hours to almost real-time.
For non-clinical environments, where regulatory clearances aren’t required, the focus shifts to features designed for teaching or research workflows.
Educational and Research Applications
The priorities for educational and research settings differ significantly from clinical environments. Regulatory certification isn’t a concern here - many tools are explicitly labeled for research use only. Instead, the focus is on flexibility, customization, and functionality tailored to learning or experimentation.
"Focusing on research, flexible low-budget software solutions are advantageous... open source tools have been recommended over free or commercial products." - Daniel Haak, Department of Medical Informatics, Uniklinik RWTH Aachen
For teaching anatomy, platforms offering 3D models, virtual cadavers, and libraries of clinical cases are invaluable. Research applications, on the other hand, benefit from advanced features like segmentation, polygon annotations, and cohort-building tools. The ability to export data for further analysis is also key. When training AI models, prioritize viewers that support high-intensity pixel rendering (up to 20,000 intensities) and multiplanar reconstruction for efficient annotation.
Some research viewers even allow exporting models for 3D printing, which is becoming increasingly popular for surgical planning and educational demonstrations. These tools enable collaborative learning and case sharing without the compliance burdens of clinical software.
Hospital and Multi-User Environments
Hospitals have unique needs, requiring scalable solutions that work across multi-user environments. As nearly two-thirds of U.S. healthcare organizations adopt or plan to adopt cloud-based systems for image viewing and storage, multi-site collaboration and remote access are becoming the norm.
System integration is critical in these settings. Your viewer must connect seamlessly with EHRs, PACS, RIS, and HIS systems. Support for modern DICOMweb standards (WADO, QIDO, STOW) ensures smooth communication with servers and PACS. Depending on your needs, you can choose between web-based "zero-footprint" viewers, which require no installation, or traditional desktop applications for powerful local rendering.
Security is another top priority. Look for features like HIPAA/GDPR compliance, AES-256 encryption, role-based access controls, and detailed audit trails to track who accessed patient data and when. Collaboration tools, such as real-time multi-user reviews, secure study sharing via encrypted links, and shared annotations, are also essential. The viewer should handle a variety of data types (CT, MRI, PET, X-ray) and offer specialized modules for departments like cardiology, oncology, or orthopedics.
"The suitable DICOM viewer can streamline workflows, enhance diagnostic capabilities, and, most importantly, contribute to improved patient care." - PostDICOM
Ease of use is vital in high-pressure hospital environments. An intuitive interface with drag-and-drop functionality can reduce staff stress during emergencies. Consider modular systems that scale from single departments to multi-site organizations without requiring a complete overhaul. Since hospitals often face high staff turnover, software that’s easy to learn and quick to adopt is essential.
Whether your focus is clinical, educational, or operational, defining your specific use case is the foundation for evaluating the right DICOM viewer for your needs.
Step 2: Review Core Features and Capabilities
After defining your use case, the next step is to dive into the technical features that will directly influence your workflow. With your requirements in hand, it's time to evaluate the tools that can streamline processes and enhance diagnostic accuracy. Not all DICOM viewers are created equal - differences in rendering quality and analysis tools can either simplify your work or create unnecessary delays.
3D Rendering and Visualization Options
One of the standout functions of a DICOM 3D viewer is its ability to transform 2D slices into 3D models. Multiplanar Reconstruction (MPR) serves as the backbone of this process, converting slices into axial, coronal, and sagittal views for a comprehensive look at anatomy from multiple perspectives. More advanced features include Oblique MPR, which allows viewing at any angle, and Curved Planar Reconstruction (CPR), designed for examining curved structures like blood vessels or the spine.
For specific imaging needs, tools like Maximum Intensity Projection (MIP) and Minimum Intensity Projection (MinIP) come into play. MIP is particularly useful for visualizing blood vessels in angiography and detecting lung nodules in CT scans, while MinIP highlights low-density structures like the bronchial tree. Average Mode (AVG), on the other hand, calculates mean values for a slab, helping to reduce noise in images.
Volume rendering takes things a step further, creating detailed 3D models from 2D data. This feature is especially helpful for surgical planning and orthopedic evaluations. Some advanced viewers even offer image fusion, which overlays different modalities (like PET-CT or PET-MR) to combine anatomical and metabolic data - an invaluable tool for oncology and complex diagnostics.
"3D rendering takes two-dimensional images and reconstructs them into three-dimensional models, providing a holistic view of anatomical structures that can be crucial for complex diagnoses and surgical planning." - PostDICOM
When assessing rendering capabilities, ensure the viewer supports OpenGL version 4.3 or higher for efficient ray casting computations. Look for features like dynamic quality adjustment, which temporarily lowers rendering resolution during 3D rotations to prevent lag. For web-based tools, check if they rely on WebGL/GLSL for smooth 3D interactions.
Once rendering capabilities are covered, the next focus should be on tools for image manipulation and analysis.
Image Manipulation and Analysis Tools
Rendering is just one piece of the puzzle. A good DICOM viewer must also offer tools that allow you to interact with and analyze images effectively. Basic controls like window leveling, zoom, pan, rotate, and cine loop playback are non-negotiable and should be intuitive to use.
Measurement precision is critical in clinical settings. Look for tools that support linear distance, angle measurements (like the Cobb angle for spinal assessments), area calculations, and 3D volumetry for tracking changes in tumors or organ sizes. Advanced viewers may even include AI-assisted segmentation, which can save significant time during analysis. High-resolution displays that support up to 20,000-pixel intensities ensure that no detail is overlooked.
For specialized work, features like image fusion, histograms, and color mapping can highlight abnormalities more effectively. Collaboration tools, such as the ability to annotate images with text notes, arrows, and markers, are also essential. Automated reporting features can further reduce the administrative burden. If you're handling sensitive data, ensure the viewer includes client-side anonymization tools to remove Protected Health Information (PHI) before sharing or uploading.
While these tools are essential, performance becomes a critical factor when dealing with large datasets.
Performance with Large Datasets
Even the most feature-rich viewer is only as good as its ability to handle large datasets efficiently. The choice between "Thick Client" applications and "Zero-Footprint" web viewers can significantly impact performance. Thick Client applications rely on high-end hardware, while Zero-Footprint viewers use server-side rendering to minimize latency. For massive studies like Breast Tomosynthesis, server-side rendering is crucial to avoid delays caused by downloading large datasets.
Hardware plays a significant role in 3D rendering. Viewers that leverage GPU acceleration can handle high-resolution images and speed up workflows, especially when combined with multi-threaded decoding for volumetric data. If you're using resource-intensive software like 3D Slicer or OsiriX MD, make sure your workstation is equipped with a dedicated GPU and ample RAM. For web-based viewers, browser performance can vary, so choose one optimized for handling WebGL and JavaScript libraries like Three.js or Cornerstone3D.
Before committing to a viewer, it's a good idea to test it with actual datasets. Try loading a high-resolution series, like a 1,000+ slice CT scan, to evaluate how smoothly it handles zooming, panning, and 3D rotation. Viewers like RadiAnt and OsiriX MD are often praised for their ability to navigate large image series without lag. With the medical imaging software market projected to grow at a compound annual growth rate (CAGR) of 7.8% from 2023 to 2030, investing in a viewer with strong performance capabilities ensures you're ready for increasingly complex datasets and helps optimize diagnostic workflows.
sbb-itb-e3aed85
Step 3: Check Platform, Deployment, and Integration Options
Standalone vs Web-Based DICOM Viewers: Feature Comparison
Once you've reviewed the technical features, it's time to figure out how the DICOM viewer fits into your existing setup. Beyond its core capabilities, it’s crucial that the viewer integrates smoothly with your infrastructure to support efficient diagnostics. The deployment model you select - whether standalone, web-based, or mobile - will play a big role in determining accessibility, performance, and how seamlessly it connects with your PACS and other imaging systems.
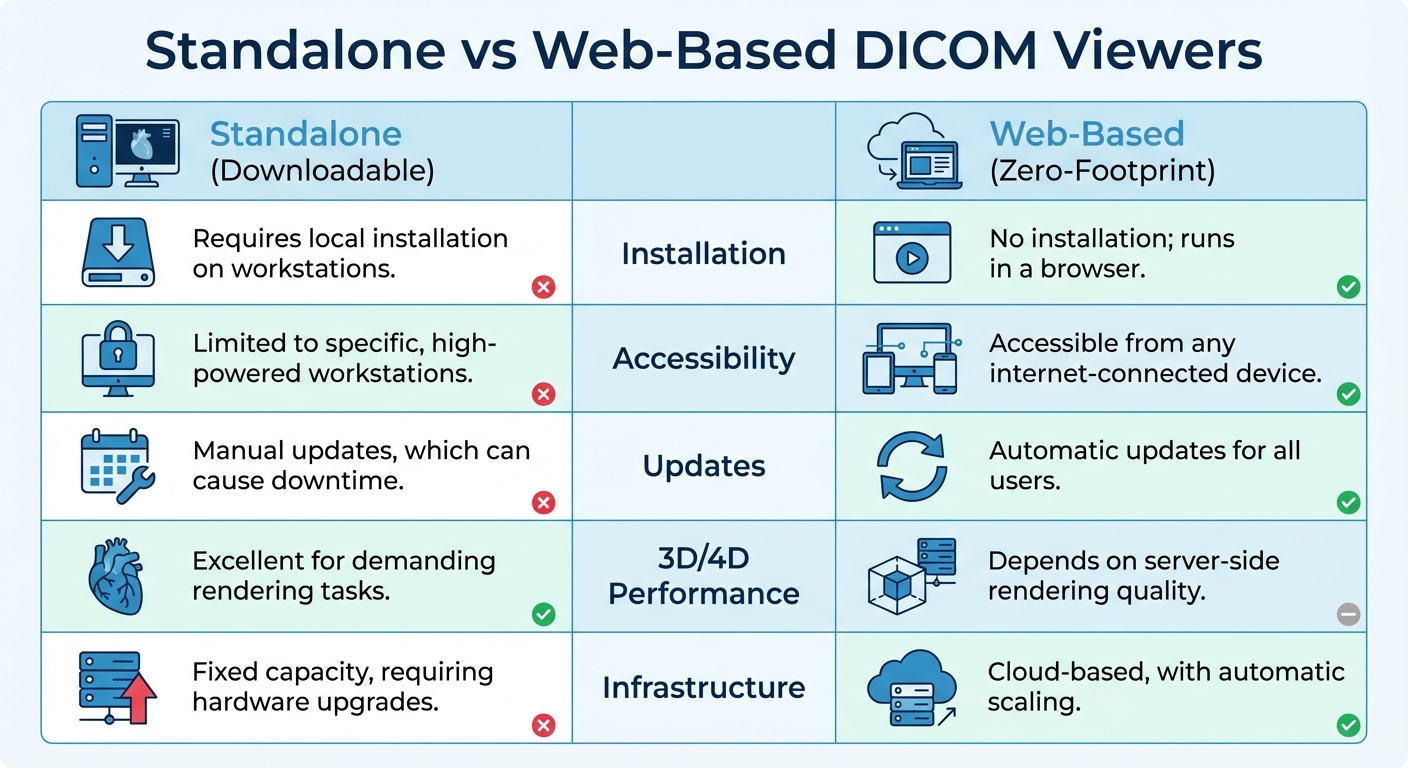
Standalone vs. Web-Based Viewers
Choosing between a standalone (desktop) viewer and a web-based (zero-footprint) viewer boils down to your specific needs for performance, accessibility, and maintenance. Standalone viewers are installed directly on high-performance workstations, making them perfect for tasks like intensive 3D or 4D rendering where high-quality image processing is essential. However, they depend on your workstation’s hardware, such as GPU and RAM, and require manual updates, which can be a hassle in multi-user environments.
On the other hand, web-based viewers operate through standard web browsers using HTML5, with no need for local installation. They use server-side rendering, processing data in the cloud and streaming it securely to your browser. This makes them ideal for remote access and teleradiology, as clinicians can view studies from any internet-connected device. Web-based viewers also shine when it comes to updates, as they’re automatic and immediate for all users, reducing IT workload. However, they do rely on a fast and stable internet connection to perform well.
| Feature | Standalone (Downloadable) | Web-Based (Zero-Footprint) |
|---|---|---|
| Installation | Requires local installation on workstations | No installation; runs in a browser |
| Accessibility | Limited to specific, high-powered workstations | Accessible from any internet-connected device |
| Updates | Manual updates, which can cause downtime | Automatic updates for all users |
| 3D/4D Performance | Excellent for demanding rendering tasks | Depends on server-side rendering quality |
| Infrastructure | Fixed capacity, requiring hardware upgrades | Cloud-based, with automatic scaling |
For hospitals or environments with multiple users, web-based viewers can greatly reduce the need for maintaining numerous workstations.
With your deployment model decided, it’s time to ensure the viewer integrates smoothly with your imaging systems.
DICOM Compatibility and PACS Integration
Flawless integration with your PACS (Picture Archiving and Communication System) is essential for most clinical workflows. Your viewer should support key DICOM communication protocols, such as DICOM Query/Retrieve (C-MOVE/C-FIND) for fetching studies and DICOM Storage (C-STORE) for sending processed data back to the PACS. Some viewers function as a DICOM node, receiving studies and pushing results back, while others integrate with the RIS worklist to prioritize cases automatically. For web-based viewers, ensure they support DICOMweb standards like WADO, QIDO, and STOW for streamlined communication with modern PACS systems.
Before making a commitment, review the vendor’s DICOM Conformance Statement to confirm their implementation aligns with your PACS. Network setup is another critical factor - you’ll need to configure IP addresses, AE Titles, ports, and firewall rules to enable bidirectional communication. To ensure data security and HIPAA compliance, use SSL/TLS encryption for data in transit. A phased approach to validation can help: test compatibility, set up network connections, implement DICOM protocols, adjust workflow settings, and run end-to-end tests with real datasets.
Now, consider whether the viewer’s platform flexibility meets your mobility and collaboration needs.
Cross-Platform and Mobile Access
Support for multiple platforms and mobile devices can make a big difference in flexibility and collaboration. Many modern viewers offer native apps for Windows, macOS, Linux, iOS, and Android, along with zero-footprint web versions that work in any modern browser. Mobile compatibility might come through dedicated apps like mRay, IDV, or DroidRender, or via responsive web interfaces such as Medicai and PostDICOM.
This flexibility offers some major advantages. Clinicians can access studies remotely on laptops, tablets, or smartphones, which helps reduce delays in reporting and allows for anytime, anywhere access. Real-time sharing of 3D models and images across devices and locations enables second opinions and telehealth consultations. Plus, mobile access allows doctors to show interactive 3D models to patients at their bedside, improving communication and understanding of conditions. Web-based viewers also eliminate the need for heavy desktop installations and manual updates, cutting down on IT overhead. Many cross-platform solutions use DICOMweb APIs to integrate seamlessly with PACS, RIS, and EHR systems.
"3DICOM has finally given me control over my medical imaging... I now have one place where I can digitally store all of my information." - Ashley C, Patient
When evaluating mobile and cross-platform viewers, confirm that the mobile version includes essential 3D tools like Multiplanar Reconstruction (MPR) or Volume Rendering if these are critical for diagnostics on the go. Test the viewer with large datasets on the devices and browsers your team uses to ensure smooth performance. Since web-based viewers rely on browser resources, lag can be an issue. Lastly, verify that the viewer complies with HIPAA and GDPR regulations, offering secure sharing options like expiring links and end-to-end encryption.
Step 4: Compare Licensing Models and Support Options
Once you've confirmed system integration, it's time to dive into licensing models and vendor support. These decisions directly impact your budget, scalability, and access to updates.
Licensing Structures and Costs
DICOM viewers come with a variety of SaaS licensing options, each with its own pricing structure and long-term considerations. Let's break down the main types:
Subscription-based models are the go-to choice for most modern web-based and desktop viewers. These plans typically charge monthly or annual fees, bundling updates and technical support into the cost. For instance, 3DICOM offers tiered plans: $29.95/year for the Patient plan, $599.95/year for the EDU plan, and $999.95/year for the FDA-cleared MD plan, which includes dedicated support. Opting for annual billing can cut licensing costs by up to 50% compared to monthly payments.
Perpetual licenses involve a one-time payment, which can be appealing if you want to avoid recurring fees. RadiAnt, for example, offers a perpetual license for its CD/DVD recorder version at around $479.80, including 12 months of updates. After the first year, you’ll need to pay a maintenance renewal fee (approximately $96.20/year) to continue receiving updates. Renewing early can even save you 20% on the renewal fee, reducing costs by about 17%.
Credit-based and pay-per-use models are another option, often used for resource-heavy features. For example, 3DICOM charges credits for tasks like AI-powered segmentation (5+ credits) or secure sharing (1 credit per scan). This model works well if you only occasionally need these advanced tools, but it's crucial to estimate your monthly usage to avoid unexpected expenses.
Open-source viewers like Horos, 3D Slicer, and OHIF eliminate licensing fees altogether, making them a popular choice for research or educational purposes. However, the hidden costs can add up. You'll need to budget for server hosting, IT maintenance, and ensuring compliance with regulations like HIPAA or GDPR.
"Open-source software enables greater customization and extensibility, which can be very useful for complex medical imaging applications that often require highly specific and customized workflows"
Keep in mind that with open-source tools, you won't have vendor support. Your team will handle all troubleshooting and security updates.
| Feature/Cost Factor | Subscription (e.g., 3DICOM) | Perpetual (e.g., RadiAnt CD/DVD) | Open Source (e.g., Horos) |
|---|---|---|---|
| Initial Cost | Low (Monthly/Annual fee) | High (One-time purchase) | Free |
| Updates | Included in subscription | Limited (e.g., 12 months free) | Community-driven |
| Long-term Support | Professional support included | Maintenance fee may apply | Community forums and wikis |
| Advanced Tools | Often via "Credits" or higher tiers | Usually included in base price | Plugin-dependent |
| Best For | Clinical/Diagnostic Use | Physical Media/Static Labs | Research/Custom Dev |
When weighing costs, look beyond the sticker price. Factor in ongoing expenses like staff training and integration. Open-source tools, while free upfront, may require more training compared to commercial options, which could increase your overall costs. Before committing, take advantage of free trials or online demos (like 3DICOM's "Playground") to test usability and see how quickly your team can adapt.
Once you've evaluated the costs, it's time to consider the quality of vendor support.
Vendor Support and Documentation
Reliable vendor support can make or break your experience with a DICOM viewer. Commercial vendors typically offer dedicated support teams with guaranteed response times, setting them apart from open-source options that rely on community forums.
When assessing support, look for vendors that provide multiple contact methods, such as email systems with tracking tickets, mailing lists, or even dedicated customer success managers. High-quality vendors also back their software with robust documentation, including user manuals, searchable knowledge bases, and video tutorials. For instance, 3DICOM’s MD and EDU plans include dedicated technical support, while the Patient plan offers only basic support. On the other hand, open-source platforms like OHIF rely on community forums, wikis, and GitHub contributors for troubleshooting.
"Choose a vendor with a proven track record of excellent customer service and ongoing technical support." - PostDICOM
Regular updates are another key consideration. Some licenses include only 12 months of updates, while subscription models often provide continuous updates. This is critical as DICOM standards and operating systems evolve. Use trial periods or demos to test how responsive the support team is and how clear the documentation feels - this will give you a realistic sense of post-purchase support.
Finally, check for onboarding and training resources. If your team has varying levels of technical expertise, a straightforward installation process and solid training materials can save valuable time.
"A DICOM viewer with a straightforward installation can be a significant time-saver. Consider a tool that could help your team get started quickly without additional configurations or dependencies"
Conclusion
Key Takeaways for Choosing a DICOM Viewer
When selecting a DICOM 3D viewer, focus on what aligns best with your specific needs. For clinical diagnosis, look for FDA-cleared options. If you're involved in research or education, open-source solutions might be more suitable. Decide between desktop-based viewers for powerful local processing or web-based tools for convenient remote access.
Seamless integration with systems like PACS, EHR, and RIS is essential for smooth workflows and meeting compliance standards. Don't overlook security features like encrypted data transfers and audit trails. Additionally, choose a licensing model - whether subscription-based, perpetual, or credit-based - that fits within your budget and operational setup.
Take advantage of free trials to test the software with your own datasets. While user ratings can provide some guidance (e.g., RadiAnt has a 4.8/5 rating on Softpedia, and Horos scores 4.6/5 on the Apple App Store), prioritize your team's specific workflow needs over general reviews.
With these considerations in mind, you're well-prepared to move forward.
Next Steps and Resources
Now that you have a clearer picture, it's time to take action. Start by defining your use case and listing the features you absolutely need, such as AI-assisted detection, support for multiple modalities, or cloud storage. Once your requirements are clear, use curated resources to compare options. For example, the All SaaS Software Directory (https://saassoftware.org) is a great starting point for exploring healthcare SaaS tools, including DICOM viewers.
Test each viewer using your own datasets to ensure it meets your expectations. If you're considering open-source tools, explore GitHub repositories and community forums to understand the level of ongoing development and support. Opt for vendors with a solid track record of regular updates to stay compatible with evolving DICOM standards and imaging technologies. Aligning the right solution with your workflow will help you keep pace in this ever-changing imaging landscape.
FAQs
Do I need FDA clearance for a DICOM 3D viewer?
When it comes to DICOM 3D viewers used for diagnostic interpretation, FDA clearance is generally a must - especially if the tool is being used for clinical diagnoses. This requirement specifically applies to products designed with diagnostic purposes in mind, meaning they have gone through the necessary FDA approval process. However, if your viewer is not intended for diagnostic use, FDA clearance might not be required.
What hardware do I need for smooth 3D rendering?
For seamless 3D rendering in DICOM viewers, it's crucial to have a powerful setup. A high-performance GPU (such as an NVIDIA Quadro), a multi-core CPU, a minimum of 32GB of RAM, and fast storage like SSDs are essential. These components work together to handle high-resolution images, perform complex calculations, and provide quick access to extensive datasets, ensuring smooth and efficient performance when dealing with 3D medical imaging.
How can I confirm PACS and DICOMweb compatibility?
To ensure compatibility, check that the DICOM viewer can retrieve images from your PACS server and supports DICOMweb standards for web-based access. Most current viewers are designed to work with PACS, enabling functions like image retrieval, viewing, and storage. For DICOMweb, confirm that the viewer supports its protocols, ensuring smooth integration with PACS systems that are also compatible. Always compare the viewer’s specifications with your PACS system’s standards and available APIs for the best results.